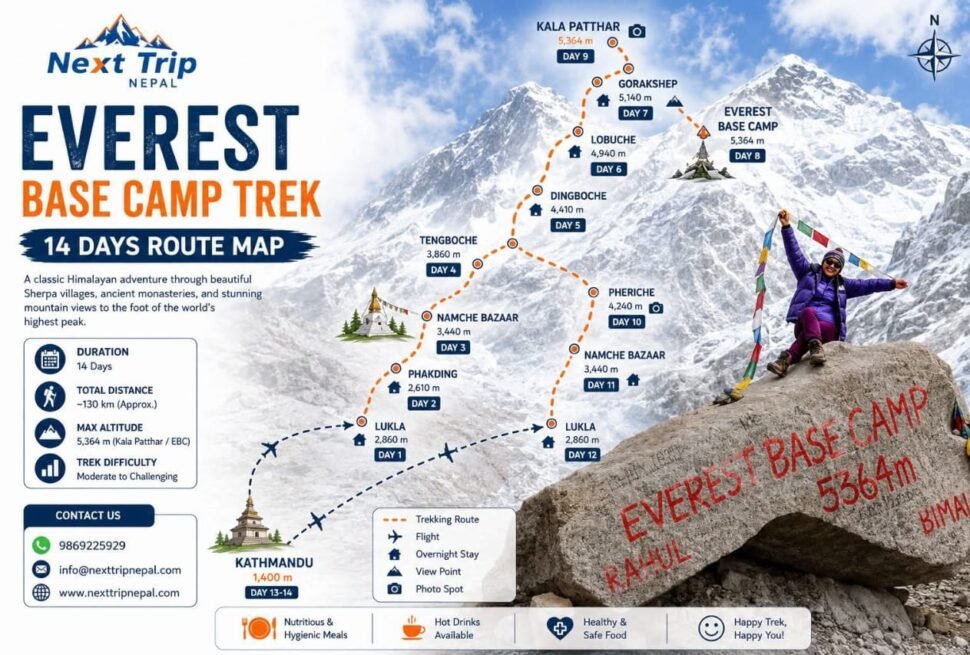
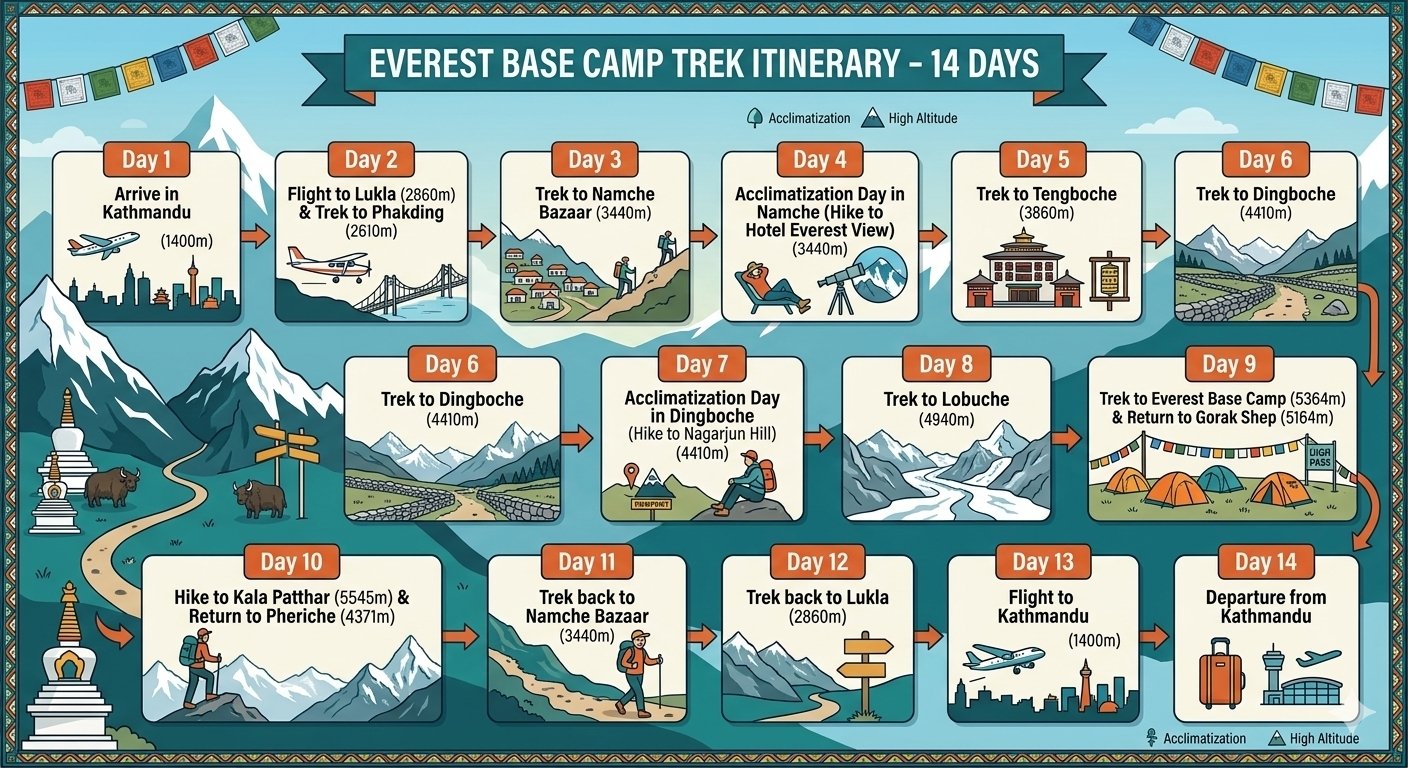
Almost every trekker planning the Everest Base Camp trek eventually asks the same practical question: what does each day actually look like. Cost articles, difficulty guides, and packing lists all matter, but none of them tell you what you will physically be doing on day six or day nine. This guide walks through the complete classic itinerary, day by day, with real distances, elevation changes, and what to expect at each stop, so you can picture the actual shape of the trip before you commit to it. If you are still deciding whether this trip belongs on your calendar at all, our piece on why so many trekkers say this trek is worth doing at least once is a good companion read.
The itinerary below reflects the standard thirteen day version of the trek that most operators run, including the two required acclimatization days, and it matches the schedule we use on our own Everest Base Camp Trek package. Individual operators shift the exact day count by adding a buffer day or two, but the sequence of villages and the logic behind the pacing stays consistent across almost every reputable itinerary in the region, since it follows the only practical trail through the valley and respects the same acclimatization science that governs safe high altitude travel anywhere in the world.
Read through each day below even if you already have a general sense of the route, since the specific details, what the trail surface feels like underfoot, where the steep sections actually fall within each day, and which stops are worth lingering at, matter far more once you are actually walking than any summary table ever could.
Day 1: Fly to Lukla and trek to Phakding
The trip begins with a short, scenic flight from Kathmandu, or from Ramechhap during the busiest spring weeks, to the small mountain airstrip at Lukla, sitting at roughly two thousand eight hundred meters and famous among aviation enthusiasts as one of the more dramatic runways in the world, with a sheer drop at one end and a mountainside at the other. From there you begin walking almost immediately, following the Dudh Kosi river valley through pine forest and small villages to Phakding, a gentle two to three hour walk that eases you into the trip without demanding much altitude gain. You will pass mule trains, porters carrying loads that seem impossibly large, and small trailside shops selling snacks and gear to trekkers just starting their journey. Most itineraries treat this as the easiest day of the entire trek, partly by design, since it gives your body a gentle first exposure to the thinner air at this elevation before anything more demanding begins.
Day 2: Phakding to Namche Bazaar
This is widely considered one of the two hardest single days on the entire route, not because of the distance itself but because of the elevation gained in a single push. You will cross the Dudh Kosi on a series of suspension bridges, including the dramatic Hillary Bridge, and then climb steadily for several hours up to Namche Bazaar at roughly three thousand four hundred and forty meters. The final approach into Namche is a long, sustained uphill section that catches many first time trekkers off guard, so pacing yourself deliberately here rather than trying to keep up with faster hikers matters more on this day than almost any other.
Day 3: Acclimatization day in Namche Bazaar
Your body needs time to adjust before climbing higher, and Namche Bazaar is where the first mandatory rest day happens. Rest day is a slightly misleading term, since the standard advice, and the plan most guides follow, involves a moderate hike up to Khumjung village or the Everest View Hotel, both a few hundred meters higher than Namche itself, before returning to sleep at the lower elevation again. This climb high, sleep low pattern is one of the most effective tools for preventing altitude sickness, and most trekkers also get their first real glimpse of Everest itself from the ridge above Namche on this day. Our full Namche Bazaar guide covers everything worth doing in town if you have extra energy left over.
Day 4: Namche Bazaar to Tengboche
The trail undulates along the valley wall with sweeping views before dropping down to cross the river again near Phunki Thanga, then climbing steeply up to Tengboche at roughly three thousand eight hundred and seventy meters, home to the most significant monastery in the entire region. Many itineraries time this day so trekkers arrive in time for the afternoon prayer ceremony at Tengboche Monastery, which, regardless of your own beliefs, tends to be one of the more memorable stops of the whole trip. Ama Dablam, one of the most photogenic peaks in the Himalaya, dominates the view from the monastery courtyard on a clear afternoon.
Day 5: Tengboche to Dingboche
The trail descends briefly through rhododendron forest to Deboche before climbing again past Pangboche, home to one of the oldest monasteries in the entire Khumbu, and the last village with a genuinely full range of services before the trail opens into the wider, more exposed upper valley. Dingboche, at roughly four thousand three hundred and fifty meters, sits in a broad valley with striking views of Ama Dablam and marks the point where trees disappear entirely from the landscape and the terrain begins to feel distinctly high alpine.
Day 6: Acclimatization day in Dingboche
The second mandatory rest day follows the same climb high, sleep low principle as the one in Namche. Most groups hike up Nangkartshang Hill directly above Dingboche, gaining several hundred meters of elevation over a few hours before returning to the village to sleep. Some itineraries instead route this acclimatization hike toward Chukkung, a side valley that offers views toward Island Peak and a genuine sense of the more remote terrain that lies off the main trail. Either version accomplishes the same physiological goal, and the choice usually comes down to what your specific guide prefers that day based on weather and group fitness. Either way, most trekkers notice their breathing becoming a little more labored on this day even during the rest hike itself, a small but useful preview of what the days ahead will demand.
Day 7: Dingboche to Lobuche
The trail climbs past Thukla, where a cluster of stone memorials honors climbers and Sherpas who lost their lives on Everest and nearby peaks over the decades, a somber and genuinely moving stop for most trekkers. From there a steady climb up the Khumbu Glacier’s lateral moraine leads to Lobuche, at roughly four thousand nine hundred and forty meters, a small cluster of basic lodges with dramatic close up views of Nuptse. The air noticeably thins by this point, and most trekkers report their pace slowing considerably compared to the lower days of the trek.
Day 8: Lobuche to Gorak Shep and Everest Base Camp
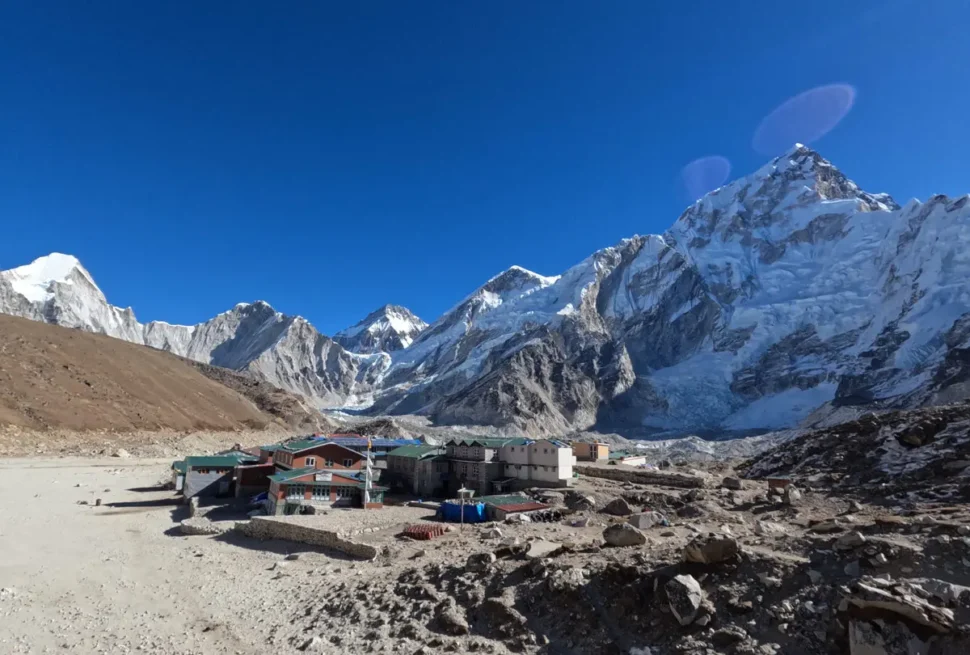
This is the day most trekkers have been anticipating since booking the trip. The trail continues along the moraine to Gorak Shep, a small settlement at roughly five thousand one hundred and forty meters sitting on what was once a frozen lake bed, where you drop your heavier gear before continuing on to Everest Base Camp itself. The final stretch to Base Camp crosses uneven glacial terrain rather than a defined trail in places, weaving between boulders and past small cairns that mark the safest line across the moraine, and reaching the collection of prayer flags and expedition markers that signal Base Camp, with the chaotic ice towers of the Khumbu Icefall rising just beyond it, is the moment most trekkers describe as the emotional peak of the entire trip. Depending on the season, Base Camp itself might be a quiet stretch of rock and ice or, during spring climbing season, a temporary tent city housing expedition teams preparing their own attempts on the summit. You return to Gorak Shep the same evening for the night, tired but, by every account we have heard from past clients, deeply satisfied.
Day 9: Kala Patthar sunrise and descent toward Pheriche or Pangboche
Most itineraries schedule an early, cold, headlamp lit start for the climb up Kala Patthar, a smaller peak above Gorak Shep at roughly five thousand five hundred and forty five meters that offers the single best panoramic view of Everest’s summit along with Nuptse and Lhotse, a view that Base Camp itself, oddly, does not actually provide due to the angle of the surrounding ridgelines. After enjoying the sunrise and the views, the rest of the day is spent descending, often a long push all the way back down to Pheriche or Pangboche, both noticeably lower and easier to breathe in than the previous several nights.
Day 10: Descending to Namche Bazaar
With acclimatization no longer a concern on the way down, this day covers more ground than most climbing days, retracing the route back through Tengboche and Phunki Thanga to Namche Bazaar. Most trekkers find this stretch considerably easier than the climb up, both because of the improving oxygen levels and because the anticipation and nervousness of the outward journey has been replaced by a settled sense of having already accomplished the main goal of the trip.
Day 11: Namche Bazaar to Lukla
The final full walking day retraces the Dudh Kosi valley back to Lukla, crossing the same suspension bridges from day two in the opposite direction, though most trekkers say the same bridges feel entirely different the second time around, less nerve wracking and more like old familiar landmarks. Most trekkers describe this day as bittersweet, tired legs mixed with a growing awareness that the trip is nearly over, and many spend the evening in Lukla reflecting on the previous ten days with fellow trekkers over a final shared dinner, often the liveliest and loudest dining room of the entire trip as everyone’s guard finally relaxes.
Day 12: Fly back to Kathmandu
A short flight returns you to Kathmandu, where hot showers, proper beds, comfortable pillows, and a wider range of food options wait after nearly two weeks of teahouse living. Many operators build a buffer day into the schedule around this point specifically because Lukla flights are notoriously weather dependent, and having a spare day in reserve prevents a single delay from disrupting international flights home. Trekkers who land in Kathmandu with a free day before their onward flight also gain the chance to visit Boudhanath Stupa, Swayambhunath, or Patan Durbar Square, a fitting way to close out a trip that began deep in the mountains and ends back among the temples and rooftops of the Kathmandu Valley.
Why most itineraries include at least one extra buffer day
The thirteen day schedule above assumes every flight runs on time and every day goes according to plan, which in the real world of Himalayan weather is optimistic more often than it is realistic. Most experienced operators, including our own team, build at least one contingency day into the schedule, usually positioned right after the Lukla to Kathmandu return flight, specifically to absorb a weather delay without threatening your onward international travel plans. Our guide to Lukla flights and weather explains exactly why this airstrip causes more schedule disruptions than almost any other in the trekking world, and why building in slack rather than booking flights back to back is the single smartest scheduling decision you can make.
The complete itinerary at a glance
| Day | Route | Approximate elevation |
|---|---|---|
| 1 | Fly to Lukla, trek to Phakding | 2,800m to 2,610m |
| 2 | Phakding to Namche Bazaar | 2,610m to 3,440m |
| 3 | Acclimatization day in Namche | 3,440m, day hike higher |
| 4 | Namche to Tengboche | 3,440m to 3,870m |
| 5 | Tengboche to Dingboche | 3,870m to 4,350m |
| 6 | Acclimatization day in Dingboche | 4,350m, day hike higher |
| 7 | Dingboche to Lobuche | 4,350m to 4,940m |
| 8 | Lobuche to Base Camp via Gorak Shep | 4,940m to 5,364m |
| 9 | Kala Patthar sunrise, descend to Pheriche | 5,545m down to about 4,240m |
| 10 | Descend to Namche Bazaar | down to 3,440m |
| 11 | Namche Bazaar to Lukla | 3,440m to 2,800m |
| 12 | Fly to Kathmandu | 1,400m |
How this itinerary compares to the helicopter return version
The itinerary above assumes you walk both directions, which is the version we recommend for most first time trekkers since it maximizes acclimatization time. If your schedule cannot accommodate thirteen days, our helicopter return itinerary follows the exact same climbing schedule through day eight, then swaps the multi day walk back out for a single flight, cutting the total trip length by roughly three to four days. The days you spend climbing, and therefore the acclimatization risk profile, remain identical between the two versions.
A slower fifteen day version for trekkers with extra time
If your schedule allows for a couple of extra days, adding a third acclimatization day, most commonly inserted at Dingboche or as an extra night at Lobuche before the push to Gorak Shep, noticeably reduces the physical strain of the final stretch. We often recommend this extended version to trekkers over fifty, to anyone who has struggled with altitude on a previous trip, or simply to trekkers who would rather move through the trip at a gentler pace and enjoy more time in each village rather than rushing between them. The extra days add modestly to the overall cost through additional guide, porter, and lodging fees, but many trekkers who take this option say afterward that the more relaxed pace let them actually absorb the experience rather than simply survive it.
The psychological rhythm of the trip as the days pass
Most trekkers go through a fairly predictable emotional arc across these thirteen days, and knowing about it in advance helps you handle it better when it happens to you. The first two or three days tend to bring a mix of excitement and nervous energy, since everything is new and the body has not yet started to feel the altitude. Around Tengboche and Dingboche, as the air thins and the walking becomes noticeably harder, many trekkers hit a quieter, more introspective stretch, sometimes accompanied by mild frustration at how much slower everything feels compared to lower altitude hiking they may have done before. The final push through Lobuche to Base Camp and Kala Patthar typically brings a surge of adrenaline and focus that carries people through the hardest physical days almost on willpower alone. The walk back out, once the main goal has been achieved, usually settles into a relaxed, reflective mood that most trekkers describe as one of the most enjoyable parts of the entire two weeks, even though it covers ground they have already seen.
Connectivity, charging, and staying in touch along the route
Wifi access, sold by the hour or by data volume at most teahouses, remains reasonably reliable through Namche Bazaar and Tengboche, then becomes progressively slower and less dependable from Dingboche onward, often disappearing entirely for a night or two around Lobuche and Gorak Shep depending on weather and local infrastructure. Device charging follows a similar pattern, widely available for a small fee in the lower villages and considerably more limited and expensive higher up, where solar power and small hydro generators cannot always keep pace with demand from dozens of trekkers charging phones and cameras simultaneously. Packing a couple of portable battery packs, charged fully before you leave Kathmandu, solves most of this problem without relying on unpredictable teahouse outlets. Our guide to wifi and internet access covers exactly what to expect village by village.
How training should map onto this schedule
Understanding the day by day shape of the trek makes it much easier to train for it specifically rather than generically. The two big single day elevation gains, day two into Namche and day seven into Lobuche, are the days that most reward specific hill training with a loaded pack beforehand, so your leg strength and cardio fitness should peak with those two days in mind. The distances themselves are moderate on most days, generally under twelve kilometers, so raw endurance matters less here than the ability to sustain steady climbing at altitude, which is exactly what our training guide is built around.
What your pack should contain on each stage of this itinerary
Your gear needs shift subtly as the itinerary progresses. The lower days through Phakding and Namche mainly require good layering for temperature swings between sunny daytime walking and cold mountain evenings. From Tengboche upward, a proper down jacket and warmer sleeping bag become essential rather than optional, since overnight temperatures at Dingboche and Lobuche regularly drop well below freezing even outside the winter months. By the time you reach Gorak Shep for the Base Camp and Kala Patthar days, every layer you own tends to come into use at some point, particularly during the pre dawn Kala Patthar climb, which is consistently the coldest few hours of the entire trip. Our full packing list is organized to match this exact progression.
What food and lodging look like along the way
Menu variety and lodge comfort both decline gradually as the itinerary climbs higher, which is worth expecting rather than being surprised by. Namche Bazaar and Tengboche still offer genuine variety, including baked goods and a wider range of dishes than you might expect this high in the mountains. By Dingboche and Lobuche, menus narrow considerably, prices rise as everything must be carried in by porter or yak, and dal bhat becomes the reliable, filling choice most guides recommend sticking with for the final stretch. Our guides to food on the trek and teahouse accommodation go into far more detail on what to expect at each stage, including room setups, blanket availability, and what a typical evening in a shared dining room actually looks and sounds like once dinner service gets busy.
Altitude sickness watch points along this itinerary
Certain days on this schedule carry a meaningfully higher risk of altitude related symptoms than others, and knowing which ones ahead of time helps you and your guide stay alert at the right moments. The jump from Namche Bazaar to Tengboche and on to Dingboche, covering roughly nine hundred meters of net gain over two walking days with only the Namche rest day behind you, is where mild headaches and reduced appetite most commonly first appear. The push from Lobuche to Gorak Shep and Base Camp, sitting above five thousand meters for the first time on the trip, is the second major watch point, and any noticeable symptoms beyond a mild headache on this day, such as persistent nausea, loss of coordination, or confusion, should be reported to your guide immediately rather than pushed through. Our detailed altitude sickness guide explains the specific symptoms to track and what a responsible guide will do if they appear, including when a descent becomes necessary rather than optional and how quickly that decision needs to be made once real warning signs show up.
Budgeting your cash day by day
Most trek packages cover guide, porter, permits, and basic lodging and meals, but extras add up as the itinerary progresses, and prices for those extras climb the higher you go since everything must be carried in on someone’s back. Expect to spend relatively little through Phakding and Namche, where competition among lodges keeps prices for snacks, hot showers, and wifi reasonably close to what you would pay lower down. By Dingboche, Lobuche, and Gorak Shep, a single hot shower can cost several times what it did in Namche, and a candy bar or a bottle of water carries a price that reflects the days of yak or porter transport behind it. Carrying enough Nepali cash from Kathmandu or Namche, where the last reliable ATMs on the route are located, avoids the stress of running short in the more remote upper villages where no banking facilities exist at all.
Photography opportunities that match this schedule
Certain days consistently produce the best photographs, and planning your energy and camera battery use around them helps you avoid missing the shots you will want later. The approach into Namche Bazaar on day two offers dramatic valley views and your first proper look at high peaks. Tengboche Monastery on day four, especially during the afternoon light with Ama Dablam behind it, is one of the most photographed single spots on the entire route. The memorial site at Thukla on day seven, while sobering rather than scenic, is a meaningful stop worth documenting respectfully. Base Camp itself on day eight, despite its somewhat chaotic jumble of rock and ice rather than a single clean vista, matters to almost every trekker as a photograph regardless of its visual drama. Kala Patthar at dawn on day nine remains, by a wide margin, the single most rewarding photography opportunity of the entire trip, and arriving early enough to claim a good position before the summit gets crowded is worth the extra effort of a pre dawn start in the cold.
Permits you need before day one
Two permits cover this entire itinerary, the Sagarmatha National Park entry permit and the Khumbu Pasang Lhamu Rural Municipality permit, both checked at points along the trail during the early days of the trek. Arranging these in advance through your operator, or picking them up in Lukla and Monjo as you pass through, both work, though most trekkers find it simpler to have their guide handle this paperwork rather than dealing with it themselves on unfamiliar ground. Our guide requirement article covers the current permit rules in full detail.
What to do with rest day energy beyond the mandatory hike
Both acclimatization days include a required uphill hike, but the remaining hours are yours to spend however you like, and how you spend them can shape your overall experience of the trip. In Namche Bazaar, many trekkers use the free afternoon to explore the town’s shops, visit the small museum dedicated to Sherpa mountaineering history, or simply sit at a bakery with a coffee and watch the town’s rhythm of porters, yaks, and fellow trekkers passing through. In Dingboche, options are more limited given the smaller size of the village, but the wide open valley views and the chance to simply rest, read, and let your body recover without walking anywhere at all are exactly what your system needs at that point in the trip. Resist the temptation to treat rest days as wasted time. The trekkers who use them properly, resting rather than overexerting themselves with extra unplanned wandering, tend to handle the higher altitude days that follow noticeably better.
The final evening in Kathmandu before you fly home
Most itineraries build in at least one night back in Kathmandu after the Lukla flight, partly as a buffer against flight delays and partly because most trekkers genuinely want it, a chance to shower properly, eat a wider variety of food, and process the trip with fellow trekkers before scattering to different flights home. Thamel, Kathmandu’s tourist and shopping district, fills up every evening with trekkers fresh off the trail from every route in the region, swapping stories over a proper restaurant meal that tastes extraordinary after two weeks of teahouse food. Many of our own clients say this final evening, unglamorous as it might sound compared with Base Camp itself, is where the trip actually starts to feel complete, since it gives you space to reflect before real life resumes.
Frequently Asked Questions
Can this itinerary be shortened without increasing risk?
Not safely below the two acclimatization days built in. Some operators compress the walking days themselves, but removing or shortening the rest days at Namche and Dingboche meaningfully increases the risk of altitude sickness regardless of your fitness level.
What happens if my Lukla flight is delayed at the start of the trip?
A delay at the very beginning simply pushes the entire itinerary back by the same number of days, which is exactly why building in an extra buffer day at the end, or arriving in Kathmandu a day or two before your scheduled departure, protects the rest of your travel plans.
How many hours do we walk on an average day?
Most days involve five to seven hours of actual walking including rest breaks, though the two big climbing days and the summit push to Kala Patthar and Base Camp both run somewhat longer.
Do all operators follow this exact same itinerary?
The core sequence of villages is nearly universal across the industry since it follows the only practical trail and the acclimatization science behind it, though individual operators vary slightly in where they place buffer days or optional side hikes.
Is it possible to add extra rest days if I feel I need them?
Yes, and a good guide will recommend exactly this if you show any symptoms of altitude sickness. Flexibility around the schedule, rather than rigid adherence to it, is one of the most important qualities in a responsible operator.
Which single day should I mentally prepare for the most?
Day two, from Phakding to Namche Bazaar, catches more first time trekkers off guard than any other single day, due to the combination of distance and sustained elevation gain right at the start of the trip before your body has adjusted at all.
Can I skip the Kala Patthar climb on day nine if I am too tired?
Yes, it is optional, though we strongly encourage attempting it since it offers the best overall view of Everest on the entire route. Trekkers who skip it due to fatigue or mild altitude symptoms generally say afterward that they wished they had found a way to make the early start work.
How much daylight do we have to work with each day?
Daylight runs from roughly six in the morning to six in the evening for most of the trekking season, which is why itineraries schedule the longer walking days to start early and why the Kala Patthar climb begins well before sunrise to reach the summit in time for first light.
Do we carry our own bags the entire way?
No, porters carry the bulk of your gear on almost every package trip, leaving you to carry only a light daypack with water, snacks, camera gear, and layers you might need during the day. Carrying your own full pack the entire way is possible but uncommon among package trekkers.
What is the coldest part of this entire itinerary?
The pre dawn climb to Kala Patthar on day nine is consistently the coldest few hours of the trip, often well below freezing with wind chill, followed closely by overnight temperatures at Gorak Shep and Lobuche on the nights before and after Base Camp.
Once you have a clear picture of the day by day shape of the trek, the next step is deciding which version fits your schedule and budget. Our guide to choosing the right route compares this classic itinerary against the helicopter return, Gokyo, Three Passes, and Jiri alternatives side by side, and our beginner focused guide is worth reading too if this would be your first time attempting anything at this altitude. Whichever exact version you choose, having this day by day map in your head before you leave home will make the entire trip feel far less like an unknown and far more like a journey you already understand the shape of.