The Everest Base Camp photography trek is planned with extra time at key viewpoints so you can shoot during sunrise and sunset, when the light is best in the mountains. The Everest Base Camp Trek itinerary includes proper acclimatisation and a flexible pace which is important for both safety and getting consistent shooting conditions.
For those looking for an Everest Base Camp trek for content creators and videographers, this route gives a wide range of subjects throughout the journey. You’ll capture major peaks like Everest, Ama Dablam, and Nuptse, along with daily life in Sherpa villages, monasteries, suspension bridges, and high-altitude landscapes.
There is enough time at places like Namche Bazaar, Dingboche, and Kala Patthar to plan shots, wait for clear weather, and work with changing light. Early mornings and late afternoons are especially useful for both photography and video.
Whether you are using a DSLR, mirrorless camera, action camera, or mobile phone, the Everest region offers reliable conditions for creating strong visual content across the entire trek.
Everest Base Camp Photography Trek Outline Itinerary
Day 1: Arrival in Kathmandu (1,320 m) and transfer to hotel
Day 2: Flight from Kathmandu to Lukla (2,860 m) and trek to Phakding (2,610 m) | 8 km | approx. 3 hrs
Day 3: Trek from Phakding to Namche Bazaar (3,440 m) | 10–11 km | approx. 6 hrs
Day 4: Acclimatization day in Namche Bazaar with hike to Everest View Hotel (3,880 m) | 4–6 km
Day 5: Trek from Namche Bazaar to Tengboche (3,860 m) | 10 km | approx. 5 hrs
Day 6: Trek from Tengboche to Dingboche (4,410 m) | 11 km | approx. 5 hrs
Day 7: Acclimatization day in Dingboche with hike to Nagarjun Hill (5,100 m) | 5–7 km
Day 8: Trek from Dingboche to Lobuche (4,910 m) | 8 km | approx. 5 hrs
Day 9: Trek from Lobuche to Gorakshep (5,140 m) and visit Everest Base Camp (5,364 m) | 12 km | approx. 7 hrs
Day 10: Hike from Gorakshep to Kala Patthar (5,545 m) then trek to Pheriche (4,240 m) | 10–12 km | approx. 7 hrs
Day 11: Trek from Pheriche to Namche Bazaar (3,440 m) | 14 km | approx. 6 hrs
Day 12: Trek from Namche Bazaar to Lukla (2,860 m) | 18–19 km | approx. 7 hrs
Day 13: Flight from Lukla to Kathmandu (1,320 m)
Day 14: Final departure
Everest Base Camp Photography Trek Price 2026 and 2027
The Everest Base Camp Photography Trek price starts from USD 1,400 per person, depending on the group size. Larger groups receive a lower cost per person.
Why Book Everest Base Camp Photography Trek with Next Trip Nepal
Experienced local team with strong knowledge of Everest trekking routes and conditions
Photography focused guides who understand best viewpoints, timing, and lighting conditions
Flexible itinerary designed around weather, visibility, and real trekking pace
Hassle free organization with permits, flights, accommodation, and logistics fully managed
Carefully selected tea houses and hotels for comfort and better location
Proper acclimatization planning to reduce altitude risk and improve overall experience
Guides who support both trekking safety and photography opportunities throughout the journey
Local expertise to position you at the right place at the right time for the best views
Clear communication before and during the trek with full support from our team
Trusted local company focused on real experience, not just selling packages
Best Time for Everest Base Camp Photography Trek
The best time for the Everest Base Camp photography trek depends on visibility, light conditions, and weather stability. Choosing the right season makes a big difference in the quality of mountain views and photography opportunities.
Spring Season (March to May)
Stable weather with clear mornings and moderate temperatures
Good balance of light and clouds for dynamic landscape photography
Rhododendron forests in bloom at lower elevations
Some haze can appear in late afternoons at lower altitudes
Autumn Season (September to November)
Best overall visibility with very clear mountain views
Dry air and sharp conditions ideal for long distance photography
Consistent weather patterns with low chance of rain
Peak trekking season so trails and lodges are busier
Winter Season (December to February)
Very clear skies and excellent mountain visibility
Cold temperatures especially above Dingboche and Lobuche
Less crowded trails for uninterrupted photography
Battery drain and gear handling can be challenging due to cold
Monsoon Season (June to August)
Cloud cover and rain reduce mountain visibility
Not ideal for Everest views and high altitude photography
Lush green landscapes at lower elevations
Flight delays to Lukla are more common
For the best photography results, spring and autumn are the most reliable seasons. These months offer the right combination of clear views, stable weather, and good lighting conditions across the Everest region.
Best Photography Viewpoints on the Everest Base Camp Trek
1. Lukla Airport (Arrival & Departure)
Lukla airport runway
Best for: Aerial shots, dramatic entry Time: Morning flights What to capture:
Aircraft landing with mountains
First Himalayan ridges from the air
Village life around Lukla
Tip: Window seat on the left side (Kathmandu–Lukla) for better views.
2. Phakding & Dudh Koshi Valley
Dudh Koshi river suspension bridge
Best for: River compositions, long exposure Highlights:
Suspension bridges
Milky river flow (great for slow shutter)
Pine forest depth shots
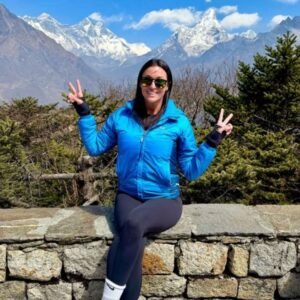
3. Namche Bazaar Viewpoint (First Everest View)
Mount Thamserku view from Namche Bazaar with prayer flags Everest region Nepal
Best for: First Everest shot + village composition Time: Early morning Highlights:
Everest + Lhotse + Ama Dablam together
Namche amphitheater shape
Cloud layers below peaks
This is where clients get their first emotional shot.
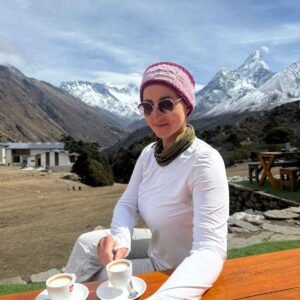
4. Everest View Hotel (Luxury Panorama Spot)
Everest and Ama Dablam view from Everest View Hotel
Best for: Clean, unobstructed mountain shots Time: Sunrise Highlights:
Everest clearly visible
Ama Dablam foreground (very photogenic peak)
Wide angle + telephoto both work well
5. Tengboche Monastery (Culture + Mountains)
Tengboche Monastery
7
Best for: Cultural storytelling Highlights:
Monastery with Ama Dablam behind
Prayer flags + monks
Spiritual atmosphere shots
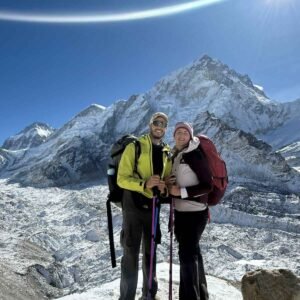
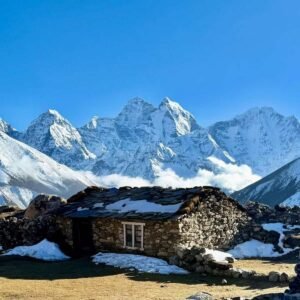
6. Pangboche & Upper Valley (Less Crowded Frames)
Pangboche village with Ama Dablam
Best for: Mountian village + close mountain shots
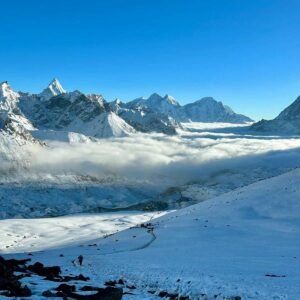
7. Dingboche Ridge (Acclimatization Hike)
Dingboche ridge panoramic viewAma Dablam towering above Dingboche village and Imja Valley from the ridge viewpoint
Himalayan mountain range view from Nangkartshang Peak Everest region Nepal
Best for: High-altitude panorama Time: Morning Highlights:
Makalu (rare to capture on EBC route)
Full Himalayan range
Strong depth layers
This is one of the best hidden photography spots.
9. Thukla Pass Memorial Area
Thukla Pass memorial site with Himalayan mountains Everest region NepalMt. Aamadblam View from Thukla pass
Best for: Emotional storytelling Highlights:
Memorials of climbers
Stark, raw landscape
Black rocks + snow contrast
10. Lobuche & Glacier Edge
Best for: Texture & abstract shots Time: Daytime Highlights:
Glacier patterns
Rocky moraine textures
Harsh alpine environment
11. Gorakshep
Mount Pumori above Gorakshep village
Best for: Unique high-altitude landscape Time: Daytime
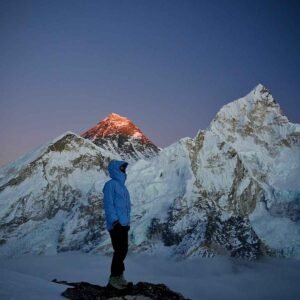
12. Kala Patthar (THE Best Everest Viewpoint)
Mount Everest sunrise view from Kala PattharThe Mount Everest view from Kala Patthar, the Everest region, Nepal
7
Best for: Iconic Everest shots Time: Sunrise (or sunset for softer light) Highlights:
Closest clear view of Everest
Pumori foreground framing
Golden light on Everest summit
Kalapathar is the main photography goal of the trek
Everest Base Camp Photography Trek Overview
The Everest Base Camp photography trek is organized as a private Everest Base Camp trek to provide a smooth and well-managed experience in the Everest region, with all essential logistics handled in advance. As an Everest Base Camp trek with proper support, the package includes permits, accommodation, meals, an experienced guide, and porter service, allowing you to focus on both trekking and capturing the journey.
The Everest Base Camp trek route follows the standard trail through Namche Bazaar, Tengboche, Dingboche, and Gorakshep, with each stop planned for proper acclimatization and better overall conditions. A steady walking pace and structured itinerary help maintain safety and comfort at higher altitude while giving enough time to observe and shoot.
The Everest Base Camp photography trek is suitable for trekkers who want a reliable and organized experience without unnecessary complications. Whether traveling solo or in a group, the setup ensures consistent support, clear planning, and a straightforward trekking journey in the Everest region.
Everest Base Camp Photography Trek Highlights
Sunrise view from Kala Patthar with clear visibility of Everest and surrounding peaks
Well paced itinerary with proper acclimatization at Namche Bazaar and Dingboche
Extended time at key photography locations instead of rushing the trail
Tengboche Monastery with direct views of Ama Dablam
Walk through Sagarmatha National Park with forests, rivers, and suspension bridges
Close up views of Khumbu Glacier and Everest Base Camp
Flexible daily schedule based on weather and mountain visibility
Comfortable accommodation arranged throughout the trek
Gradual ascent through Sherpa villages like Namche Bazaar and Dingboche
Visit to Tengboche Monastery, the spiritual center of the Khumbu region
Walk inside Sagarmatha National Park with diverse landscapes
14 Days Everest Base Camp Photography Trek Itinerary
Day 01
Arrival in Kathmandu (1,320 m)
After arriving at Tribhuvan International Airport, you will be welcomed by the team of Next Trip Nepal and transferred to your hotel in Kathmandu. The drive to Thamel area takes around 20 to 30 minutes depending on traffic. Once you check in, you can rest after your journey or take a short walk around the local streets.
In the afternoon or evening, there will be a detailed trek briefing focused on the Everest Base Camp photography trek. This includes route planning, altitude awareness, weather conditions, and daily walking expectations. Special attention is given to photography planning, such as the best viewpoints, timing for sunrise and sunset, and how to manage your gear in cold conditions.
You will also go through your equipment, especially camera gear. It is important to check batteries, memory cards, and protection for dust and temperature changes before heading into the mountains where options are limited. If anything is missing, Thamel has many trekking and photography shops for last-minute purchases or rentals.
This day is mainly for preparation and adjustment. A good rest, proper hydration, and early sleep will help you start the trek smoothly the next morning.
Breakfast
3 Stars Hotel
Day 02
Flight from Kathmandu to Lukla (2,860 m) and trek to Phakding (2,610 m) | 8 km | approx. 3 hrs
Your day starts early with a scenic flight to Lukla, landing at the famous Tenzing Hillary Airport, one of the most unique mountain airstrips. On clear days, the flight itself offers great Himalayan views, making it a strong start for photography.
After landing, you begin the trek by passing through the Pasang Lhamu Memorial Gate, which marks the official entry into the Khumbu region. The trail is relatively gentle, following the Dudh Koshi river through small settlements and pine forest.
Along the way, you will cross several suspension bridges, which are excellent spots for capturing movement, depth, and river landscapes. The route also offers opportunities to photograph prayer stones, mani walls, and local village life.
The walk continues gradually to Phakding village, a peaceful riverside settlement surrounded by greenery and hills. Since this is a shorter day, you have enough time to explore the area, adjust your gear, and capture natural light in the late afternoon.
Breakfast + Lunch + Dinner
Tea House
Day 03
Trek from Phakding to Namche Bazaar (3,440 m) | 10–11 km | approx. 6 hrs
Distance 10–11 km | approx. 6 hours
The day begins with a steady walk along the Dudh Koshi river, passing through small settlements and pine forest. The trail crosses several suspension bridges, including the well known Hillary Bridge, which is one of the most iconic spots on the Everest Base Camp trek and a great place for photography.
After Monjo, you officially enter Sagarmatha National Park, where permits are checked. From here, the trail follows the river through forested sections with occasional views of Thamserku mountain rising sharply above the valley. You may also see yaks and mule caravans transporting goods along the trail, adding strong cultural elements for photography.
You will pass Jorsalle, the last village before the main climb to Namche. After crossing the final suspension bridge, the trail ascends steadily uphill. This is the most challenging part of the day, but if the weather is clear, you may catch your first glimpse of Mount Everest along the way.
The climb leads you into Namche Bazaar, the main Sherpa town and trading center of the region, where you stay overnight.
Breakfast + Lunch + Dinner
Tea House
Day 04
Acclimatization day in Namche Bazaar with hike to Everest View Hotel (3,880 m) | 4–6 km
This is an important acclimatization day, but also one of the best early photography days of the Everest Base Camp trek. After breakfast, you hike up to the Namche viewpoint above the town, where you get a wide panoramic 360 degree view of the surrounding peaks and valleys. This spot is ideal for landscape photography, especially in the morning when visibility is clear.
From there, you continue towards Everest View Hotel (3,880 m), one of the highest located hotels in the world. This is the first place on the trek where you clearly see Mount Everest (8,848.86 m). The viewpoint here offers one of the best compositions for photography, with Everest in the background and other major peaks surrounding it.
You can capture a full range of Himalayan giants from this location including Ama Dablam (6,812 m), Thamserku (6,608 m), Tawoche (6,542 m), Lhotse (8,516 m), and Nuptse (7,861 m). The open landscape and elevation provide clean, unobstructed views, making it one of the best early spots for high quality mountain shots.
After spending time here for photography and rest, you return to Namche Bazaar for overnight stay. This gradual hike helps your body adjust to altitude while giving you one of the most rewarding viewpoints of the entire trek.
Breakfast + Lunch + Dinner
Tea House
Day 05
Trek from Namche Bazaar to Tengboche (3,860 m) | 10 km | approx. 5 hrs
The day begins with a gradual trail known locally as “Nepali flat.” This does not mean completely flat, but rather a relatively easy and steady path with gentle ups and downs. Compared to steep climbs, this section feels comfortable and allows you to walk at a relaxed pace while enjoying continuous mountain views.
From this section, you get excellent views of Everest, Lhotse, Nuptse, and especially Ama Dablam, which appears very prominent along the trail. It is one of the best stretches for walking photography as the mountains remain visible for a long time.
After this, the trail descends down to Phunki Thanga (3,250 m), a riverside spot where you usually stop for lunch. The descent is through forested areas and can be a good place to capture nature and trail scenes.
After lunch, the trail climbs steadily uphill through pine and rhododendron forest towards Tengboche. This is a continuous ascent and can feel demanding, but the surroundings make it worthwhile.
You reach Tengboche, which is home to the famous Tengboche Monastery, the most important monastery in the Khumbu region. The area is surrounded by mountains and offers one of the most iconic views with Ama Dablam directly in front. Around the monastery, you will see mani stones, prayer flags, and a peaceful open setting, making it a perfect place for both cultural and landscape photography.
Breakfast + Lunch + Dinner
Tea House
Day 06
Trek from Tengboche to Dingboche (4,410 m) | 11 km | approx. 5 hrs
The day starts early with one of the best sunrise views on the Everest Base Camp trek. From Tengboche, you can see the first light hitting Ama Dablam, Everest, Lhotse, and surrounding peaks, making it an ideal moment for photography. The soft morning light and clear skies often create the best conditions for sharp mountain shots.
After breakfast, the trail descends for about 20 minutes through forest to Debuche. The path is comfortable and easy, passing through a quiet area with fewer crowds. You then continue towards a suspension bridge over the Imja Khola, with mountains visible in the background, offering a good combination of landscape and trail photography.
From here, the trail gradually opens up as you move above the tree line. You get some of the best close views of Ama Dablam along this section, along with distant views of Everest and Lhotse.
Passing through Pangboche village (3,985 m), you also get a good angle of Tawoche mountain, which stands prominently above the valley. This section is rich in both cultural and mountain photography, with traditional houses, fields, and wide open landscapes.
The final part of the trek continues gradually to Dingboche, a wide valley surrounded by mountains, where you stay overnight.
Breakfast + Lunch + Dinner
Tea House
Day 07
Acclimatization day in Dingboche with hike to Nagarjun Hill (5,100 m) | 5–7 km
This is one of the best photography days of the entire Everest Base Camp trek. After breakfast, you hike up to Nagarjun Hill above Dingboche, a popular acclimatization point with wide open views.
As you climb higher, Ama Dablam (6,812 m) comes directly in front of you, very close and clear. From this position, it is one of the best compositions on the trek. Along with it, you also see Tawoche (6,542 m), Cholatse (6,440 m), and Kangtega (6,782 m), all standing prominently across the valley.
Looking down, you get a full view of Dingboche village and the entire Imja Valley. The combination of stone-walled fields, open landscape, and surrounding peaks makes this one of the most photographed areas in the Everest region. Many of the images you see online are taken from this viewpoint because the scenery is clean, wide, and very dramatic.
Lighting conditions are usually very good, especially in the morning, making it ideal for mountain photography. This day often feels like a highlight of the trek for photographers.
After descending back to Dingboche, you can relax and recover. The village has good tea houses and even a few bakeries where you can enjoy fresh food and coffee, which is a nice comfort at this altitude before continuing higher.
Breakfast + Lunch + Dinner
Tea House
Day 08
Trek from Dingboche to Lobuche (4,910 m) | 8 km | approx. 5 hrs
Leaving Dingboche, the trail follows a gradual path across a wide open valley before reaching Thukla. The landscape becomes more rugged and alpine, with fewer trees and more exposed terrain. Along this section, you get clear views of Tawoche (6,542 m), Cholatse (6,440 m), Lobuche East (6,119 m), and Pumori (7,161 m), which start to dominate the skyline.
At Thukla, most trekkers stop for lunch before continuing. The next part is a steady uphill climb to the Thukla Pass, where memorials of climbers are placed. This area has a quiet atmosphere and is an important landmark on the route.
After the pass, the trail continues along a high glacial valley with expanding mountain views. From here, you can clearly see Pumori, Nuptse (7,861 m), and Khumbutse (6,636 m). The terrain feels more remote as you approach Lobuche, where you stay overnight.
Breakfast + Lunch + Dinner
Tea House
Day 09
Trek from Lobuche to Gorakshep (5,140 m) and visit Everest Base Camp (5,364 m) | 12 km | approx. 8 hrs
The trail from Lobuche follows a gradual path along the Khumbu Glacier, with a rocky and uneven surface. This section gives a close view of the glacier and surrounding high peaks, creating a unique high altitude landscape. Along the way, you can see Nuptse (7,861 m), Pumori (7,161 m), and Khumbutse (6,636 m) dominating the skyline.
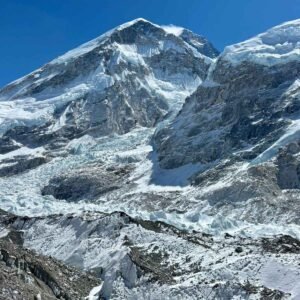
After a few hours, you reach Gorakshep, the last settlement on the trek. After a short rest and lunch, you continue towards Everest Base Camp. The trail is slightly challenging due to rocky terrain, but the views of the Khumbu Icefall and glacier formations make it very rewarding.
At Everest Base Camp (5,364 m), you stand at the base of the world’s highest mountain. While Everest itself is not fully visible from here, the surrounding icefall, glacier, and expedition environment create a powerful atmosphere. This is a major highlight of the trek and a memorable location for photography.
After spending time at base camp, you return to Gorakshep for overnight stay.
Breakfast + Lunch + Dinner
Tea House
Day 10
Hike from Gorakshep to Kala Patthar (5,545 m) then trek to Pheriche (4,240 m) | 10–12 km | approx. 7 hrs
Early morning, you hike to Kala Patthar, the highest viewpoint of the Everest Base Camp trek. From the top, Everest (8,848.86 m) appears much closer and fully visible, unlike from base camp.
During sunrise, the first light hits Everest, Nuptse, and Pumori, creating golden colors and sharp contrast. This is considered one of the best sunrise views in the world and a key photography highlight of the entire trek. The wide open angle allows clean shots of multiple peaks without obstruction.
After spending time for photography, you descend to Gorakshep for breakfast and then continue trekking down towards Pheriche. As you lose altitude, breathing becomes easier and the trail feels more comfortable.
Breakfast + Lunch + Dinner
Tea House
Day 11
Trek from Pheriche to Namche Bazaar (3,440 m) | 14 km | approx. 6 hrs
The trail descends gradually through Pangboche and continues along the Imja Khola valley before rejoining the main route near Tengboche. As you lose altitude, the oxygen level improves and walking feels easier compared to previous days.
From Pangboche, you again get good views of Ama Dablam along with surrounding peaks. The trail passes through forested sections with pine and rhododendron trees as you descend towards Phunki Thanga and then climb slightly back to Tengboche.
From Tengboche, the route follows the same scenic path back to Namche Bazaar. The long traverse section offers continuous mountain views, making it a good opportunity for landscape photography on the return journey.
You reach Namche Bazaar by afternoon, where you can enjoy better facilities, bakeries, and a more comfortable stay after several days at higher altitude.
Breakfast + Lunch + Dinner
Tea House
Day 12
Trek from Namche Bazaar to Lukla (2,860 m) | 18–19 km | approx. 7 hrs
The trail descends gradually from Namche through the same route, passing through forests and small settlements. You cross suspension bridges over the Dudh Koshi river and continue through villages like Monjo and Phakding.
Since you are losing altitude, the walk feels easier and more relaxed. Along the way, you can again capture river landscapes, local village life, and final views of the lower Khumbu region.
After passing through Lukla gate and completing the last section of the trail, you arrive in Lukla. This marks the end of the trekking journey. You can relax and enjoy the final evening in the mountains with your team.
Breakfast + Lunch + Dinner
Tea House
Day 13
Flight from Lukla to Kathmandu (1,320 m)
You take an early morning flight back to Kathmandu. Weather in Lukla is usually clearer in the morning, so flights are scheduled early. During the flight, you can enjoy final aerial views of the Himalayan range.
After landing in Kathmandu, you are transferred to your hotel. The rest of the day is free to relax, explore the city, or enjoy a proper meal after the trek. In the evening, there will be a farewell dinner with the team, where you can share your trekking experience and celebrate the completion of the journey. You will also receive your trek completion certificate.
Breakfast + Dinner
3 Stars Hotel
Day 14
Final Departure
This is your departure day. Depending on your flight schedule, you will be transferred to the airport. If you have extra time, you can do some last-minute shopping or explore nearby areas in Kathmandu.
Your Everest Base Camp photography trek ends with your departure.
What is Included in Everest Base Camp Photography Trek Cost
Airport pickup and drop in Kathmandu
2 nights hotel in Kathmandu with breakfast
Domestic flights Kathmandu to Lukla to Kathmandu
All necessary permits (Sagarmatha National Park and Khumbu local permit)
Experienced English speaking trekking guide
Porter service (1 porter for 2 trekkers)
Accommodation in tea houses during the trek
Three meals a day during trekking (breakfast, lunch, dinner)
Guide and porter salary, food, insurance, and equipment
Local NTC SIM card with 4G data (where coverage is available)
Backup power bank for charging during trek
WiFi access card (where available along the route)
Trekking map and necessary documents
Farewell dinner in Kathmandu
Trek completion certificate
What is Excluded in Everest Base Camp Photography Trek Cost
International flights to and from Nepal
Nepal visa fee
Travel insurance (must cover high altitude and helicopter evacuation)
Personal expenses (snacks, drinks, WiFi, hot shower, charging)
Extra night hotel in Kathmandu due to early arrival or flight delay
Tips for guide and porter
Any additional costs due to weather, flight delays, or personal reasons
Everest Base Camp Photography Trek FAQs
What is the best time of day for photography on Everest Base Camp trek?
Early morning and late afternoon offer the best light conditions. Sunrise provides clear skies and golden light, while sunset gives soft tones and dramatic shadows on the mountains.
Can beginners do Everest Base Camp photography trek?
Yes, beginners can do this trek with proper preparation. Good fitness, a slow pace, and following the guide’s instructions are important. No technical climbing is required.
Do I need prior photography experience for this trek?
No, prior experience is not required. The trek is suitable for both beginners and experienced photographers. The key is being at the right place at the right time.
How cold does it get during the photography trek?
Temperatures can drop below freezing, especially at night and early morning. At higher altitude like Gorakshep and Lobuche, it can go below -10°C in colder months.
Can I charge camera batteries during the trek?
Yes, charging is available in tea houses along the Everest Base Camp trek for an extra cost. Up to Namche Bazaar, you can charge for free, but after Namche, you need to pay due to limited electricity.
Charging typically costs around 5 to 7 USD for mobile phones and about 4 USD per battery. Power bank charging can cost around 5 to 10 USD depending on the location and altitude.
Because of cold temperatures and higher costs at altitude, it is strongly recommended to carry extra batteries and a good quality power bank.
Can I rent photography gear in Kathmandu?
Yes, some shops in Kathmandu offer camera gear rental, but availability is limited. It is better to bring your own equipment.
Is Everest Base Camp photography trek worth it?
Yes, it offers some of the best mountain views in the world with multiple photography opportunities including landscapes, culture, and high altitude environment.
What camera gear should I bring for Everest Base Camp Trek?
A lightweight DSLR or mirrorless camera works best. Carry a wide angle lens for landscapes and a zoom lens for distant peaks. Bring extra batteries, memory cards, and basic protection for dust and cold.
How should I prepare for Everest Base Camp trek?
Focus on cardio fitness like hiking, walking, or stair climbing. Prepare mentally for altitude and basic conditions. Good preparation makes the trek much easier.
Is Everest Base Camp trek safe?
Yes, it is safe with proper planning and experienced guides. The main risk is altitude, which is managed with acclimatization and pacing.
Should I choose a private or group trek?
Private treks offer flexibility and personal pace. Group treks are more social and cost effective. Both options are available based on preference.